
Imagine your guests’ faces lighting up as they lay their eyes on your exquisitely decorated masterpiece with gumpaste gerbera daisy flowers. These lifelike floral designs will take your cake to new heights, leaving everyone in awe of your artistic skills. Whether you’re a seasoned baker or a novice just starting out, we will walk you through each and every step, ensuring that you create the most stunning gerbera daisies imaginable.

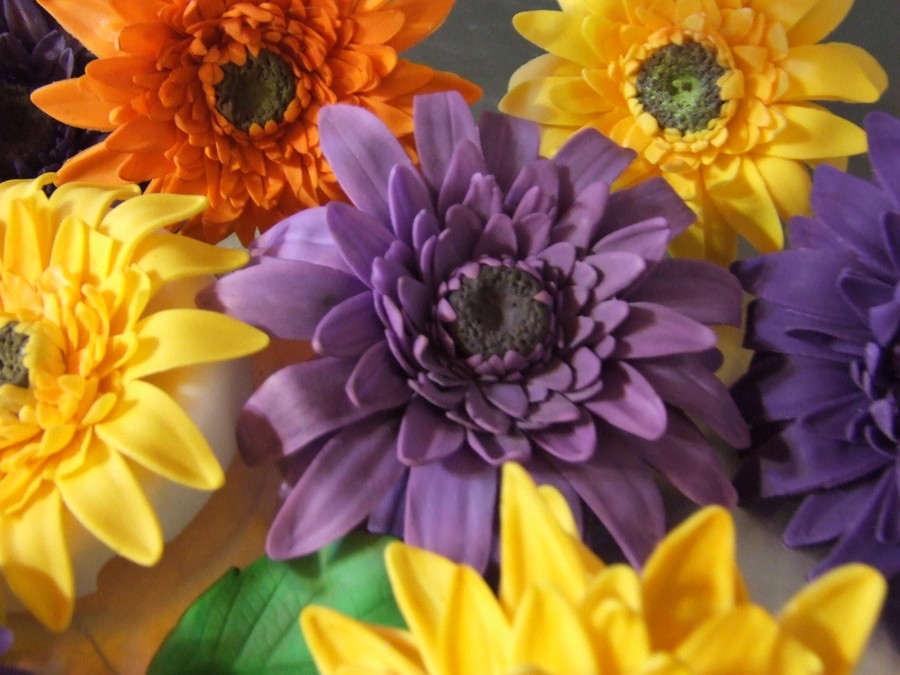
Gerbera daisies are native to South Africa but are now cultivated in many parts of the world. They are known for their large, colorful blooms and long, sturdy stems. With their bold and vibrant petals, they bring a sense of joy and happiness to any cake design.
These flowers symbolize innocence, purity, and beauty. Their presence in cake decorating adds a touch of playfulness and charm, making them perfect for birthday cakes, celebrations, or even wedding cakes. Whether you’re aiming for a romantic, modern, or whimsical aesthetic, gerbera daisies can be easily incorporated into your cake design to achieve the desired effect.
Available in a wide range of colors, including pink, orange, red, yellow, and white, gerbera daisies offer endless possibilities for creative cake decoration. Whether you choose a single color or a vibrant mix, these flowers will undoubtedly add a striking element to your cake and grab everyone’s attention.
Gathering the Materials
- To create gumpaste gerbera daisies, you will need a few essential materials. First, you’ll need gumpaste, which is a special type of sugar paste that is pliable and dries hard. Gumpaste can be found at most cake decorating stores or online, and it is the perfect medium for crafting delicate flower petals.
- Next, you will need a set of petal cutters specifically designed for gerbera daisies. These cutters will allow you to achieve the distinct shape and size of the daisy petals. Look for a set that includes multiple sizes to give you flexibility in creating different-sized flowers.
- A rolling pin is also necessary to roll out the gumpaste to the desired thickness. Make sure to use a non-stick rolling pin or cover your rolling pin with a thin layer of cornstarch or powdered sugar to prevent sticking.
- In addition to these tools, you will need a foam pad. This pad provides a soft surface for thinning the edges of the petals, giving them a more natural and lifelike appearance.
- Finally, you will need a few basic supplies such as a small paintbrush and edible glue or water. These will help you attach the petals together and add any additional details or color to your flowers.
Gumpaste Gerbera Daisy by Shawna McGreevy
How to make a Sugar Gerber aka Gumpaste Gerbera by Alan Tetreault
Before you begin, gather a few essential supplies such as a small paintbrush and edible glue or water. These tools will aid in attaching the petals together and adding any final touches or color accents to your beautiful blossoms. With these materials in hand, you are all set to delve into the process of creating lifelike petals that will make your gumpaste gerbera daisies truly stand out on your cake.
Creating Lifelike Petals
To create stunning gumpaste gerbera daisies that will take your cake to the next level, it’s important to focus on crafting lifelike petals. This step is crucial because it will determine the overall appearance and realism of your flowers.
- To start, take a small piece of gumpaste and knead it until it becomes soft and pliable. Dust your work surface with cornstarch or confectioners’ sugar to prevent sticking. Roll out the gumpaste using a rolling pin, aiming for a thickness of about 1/8 inch.
- Next, using a petal cutter that matches the size you desire, press it firmly into the rolled-out gumpaste. Twist and lift the cutter slightly to separate the petal from the excess paste. Gently remove the petal and place it on a foam pad or crumpled aluminum foil to give it a natural curve.
- To add depth and realism, use a ball tool to thin out the edges of the petal. Starting from the center, gently press and roll the ball tool along the edges, exerting light pressure to create a gradual taper. This technique will give your petal a delicate, lifelike appearance.
- Repeat this process to create as many petals as needed for your gerbera daisy. Remember that a typical gerbera daisy consists of around 12 to 15 petals, so plan accordingly.
- Once all the petals are shaped, set them aside to dry for a few minutes. This will ensure that they keep their form and do not become distorted when you assemble the flower.
Gumpaste Gerbera / Daisy Tutorial by CakesbyLynz
Gumpaste Gerbera Tutorial by Aleksa Cakes
Assembling the Gerbera Daisy
To truly bring our gumpaste gerbera daisies to life, we must now focus on the process of assembling these delicate blossoms. After all the careful shaping and molding of each individual component, it’s time for us to see the fruits of our labor come together in a beautiful, cohesive whole. By following these steps, we will be one step closer to transforming our cake into a breathtaking masterpiece.
- First, gather all the necessary elements for assembly, including the gumpaste petals, leaves, and the carefully shaped center we prepared in the previous step. Lay them out in front of you, arranging them in an organized manner for ease of access as we proceed.
- Next, take one of the gumpaste petals and gently curve it inwards, creating a slight cup-like shape. This will provide the foundation for our gerbera daisy’s three-dimensional appearance. Repeat this process with the remaining petals, ensuring each one has been shaped in the same manner.
- Now, it’s time to build our flower. Begin by applying a small amount of edible glue onto the center of the first petal. Carefully attach it to the center we shaped earlier, making sure it is securely in place. This acts as the base petal, anchoring the rest of the flower.
- Continue adding petals one by one, affixing them to the base petal with a gentle touch and a dab of edible glue. As you progress, be attentive to the positioning and alignment of each petal, aiming to create a natural, layered effect. Ensure that the petals are evenly spaced and slightly overlapping, mimicking the way a gerbera daisy naturally blooms.
- Once all the petals have been attached, take a moment to adjust and refine the shape of the flower as needed. Gently manipulate the petals, shaping them to create a full and visually pleasing form. This step allows our gerbera daisy to truly come alive, radiating with the vibrancy and beauty we desire.
- With the gerbera daisy’s structure in place, we can now move on to adding the finishing touches, further enhancing its realistic appearance. By incorporating the final details and nuanced elements, our gumpaste gerbera daisies will exude an irresistible charm that will captivate anyone lucky enough to lay eyes upon our cake.,
How to make Gumpaste Gerbera Daisy by Annie’s Little Valley
Flower Pro Gerbera Daisy For Cake Decorating by Katy Sue Designs
Adding the Finishing Touches
- The finishing touches are where we bring our artistry and creativity to the forefront. Consider using a small amount of edible dust to add subtle color variations to the petals, mimicking the natural shading found in real gerbera daisies. A gentle dusting of yellow in the center and along the edges can create a lifelike depth and dimension.
- Additionally, we can use a food-safe brush to apply a touch of petal dust to the tips of the petals, creating delicate highlights and highlighting their texture. This simple technique can make a world of difference in making our gumpaste gerbera daisies look truly lifelike.
- Furthermore, don’t forget about the center of the flower. Carefully paint the yellow center with a mix of edible yellow food coloring and a touch of brown to achieve a realistic stamen. This attention to detail will make our gumpaste gerbera daisies stand out and elevate the overall appearance of our cake.
- Once the finishing touches are complete, step back and admire our masterpiece. The gumpaste gerbera daisies now exude a captivating allure, almost too beautiful to eat. These exquisite floral decorations will undoubtedly become the focal point of any celebration.
How to Make a Sugar Flower Gerbera – Samantha Mayfair Cakes
How to make Gerbera Daisy Flower by Bake Me A Wish
Easy Gerbera Daisy by Sweet Wise
Frequently asked questions
The drying time for gumpaste gerbera daisies can vary depending on various factors such as the thickness of the petals and the humidity in your environment. On average, it usually takes around 24 to 48 hours for the flowers to fully dry. To speed up the drying process, you can place the flowers in a cool, dry area with good air circulation.
Absolutely! Gumpaste gerbera daisies can be made well in advance of your event. Once fully dried, the flowers can be stored in an airtight container in a cool, dry place for several weeks. Just make sure to handle the flowers with care when storing and transporting them to prevent any breakage.
Yes, you can add color to your gumpaste gerbera daisies using edible dust or gel food coloring. It’s best to color the petals before assembling the flower, allowing each layer to dry completely before adding the next color. Remember to use a soft brush and apply the color in light, even strokes to achieve a natural and realistic look.
While gumpaste gerbera daisies are typically used on fondant-covered cakes, they can also be placed on buttercream cakes. However, keep in mind that the moisture from the buttercream may affect the durability of the gumpaste flowers. To minimize any potential issues, it’s recommended to attach the flowers to a small fondant disc or piece of parchment paper before inserting them into the buttercream.

Camera Cake Tutorials

Spongebob Cake Tutorials

Edible Sugar Print Cake Tutorials

Fashionista Cake Tutorials
Picture tutorials – Step by Step Photo Tutorials for Gumpaste Gerber Daisy


Images for Inspiration


Sugar flowers by – Soul Cake, The Cake Artist Mk, asli, lucycoogancakes,
MBalaska, cakedeluxebysusy, Butter&, Loredana Atzei, Karen Dodenbier, Galya’s Art, Laura e Virna just cakes

Description
Equipment /Tools
- Gerbera daisy petal cutter set (typically comes with various petal sizes)
- Edible glue or clear alcohol (e.g., vodka)
- Green gumpaste or floral tape (for the stem and leaves)
Ingredients
- 250 g Gumpaste in the desired colors for the petals and center (typically white or a color to match the wedding theme)
- Petal dust in your choice of colors
Instructions
- Prepare Your Workspace: Make sure your work area is clean and dry. Wash your hands thoroughly to avoid transferring dirt or oils to the gumpaste.
- Knead the Gumpaste: Start by kneading your gumpaste until it's soft and pliable. If you want to tint the petals, add some food coloring gel and knead it into the gumpaste until the color is evenly distributed.
- Create a Center: Roll a small piece of gumpaste into a ball for the center of the flower. You can tint it yellow or brown for realism. Use a ball tool to create an indentation in the center of the ball to mimic the natural shape of the Gerbera daisy center.
- Attach the Wire: Insert a thin wire or floral wire into the center of the ball. Ensure that it's securely attached by gently twisting it. Allow the center to dry for a few hours or until firm.
- Roll Out the Gumpaste: Dust your work surface with cornstarch or use a non-stick mat. Roll out the colored gumpaste into a thin sheet (about 1/16 to 1/8 inch thick) using a rolling pin.
- Cut Out the Petals: Use the Gerbera daisy petal cutter set to cut out petals of various sizes. You will need several petals of different sizes to create a layered effect.
- Thin the Petals: Place each petal on a foam pad or flower former. Use a ball tool to thin the edges of each petal gently. This will give the petals a more natural and lifelike appearance.
- Assemble the Flower: Start assembling the flower by attaching the smallest petals to the center using edible glue or a mixture of clear alcohol and gumpaste scraps. Overlap the petals slightly and arrange them evenly around the center.
- Continue Layering: Continue adding petals, working your way outward and using progressively larger petals as you go. Ensure that the petals overlap and fan out naturally.
- Shape the Flower: Gently curve the edges of the petals to give the flower a more natural and open appearance.
- Let the Flower Dry: Set the assembled Gerbera daisy aside to dry completely. This can take 24 hours or longer, depending on the humidity in your environment.
- Create the Stem and Leaves: To make the stem, you can either use a piece of green gumpaste shaped into a thin rod or cover a floral wire with green floral tape. Attach any green leaves you desire to the stem.
- Attach the Flower to the Stem: Once the Gerbera daisy has dried and is firm, attach it to the stem using floral tape. Secure it by wrapping the tape around the base of the flower and stem.
- Optional Shading: If you want to add depth to the center, you can lightly dust the indentation with yellow or brown petal dust using a paintbrush.
- Final Touches: Trim the stem to the desired length for your wedding cake. If you have multiple Gerbera daisies, you can arrange them in a bouquet or as individual decorations on the cake.
Recipe Notes
- Practice and Patience: Sugar flower crafting is an art that takes time to master. Be patient with yourself and allow room for improvement as you practice.
- Prepare Your Workspace: Ensure your work area is clean, and your hands are washed and dry. Any dirt or oil can affect the quality of your gumpaste.
- Knead Gumpaste Properly: Knead the gumpaste until it’s soft, pliable, and free from air bubbles. If you’re tinting the gumpaste, do so evenly.
- Use Appropriate Tools: Invest in quality tools for shaping, thinning, and texturing the petals and center. Tools like ball tools, foam pads, and cutters specifically designed for sugar flowers can make a big difference.
- Thinning Petals: When thinning the edges of petals, apply gentle and even pressure to avoid tearing them.
- Create Realistic Textures: Pay attention to the details when creating textures on petals and the flower center. The more realistic the texture, the more lifelike your flower will appear.
- Wire Management: Ensure that the wires you use for the center and stem are securely attached. Twisting the wire or using floral tape can help with stability.
- Drying Time: Allow each component (petals, center, stem, leaves) to dry thoroughly before assembly. This helps maintain the shape and prevents sagging.
- Color Choice: Choose colors that match the wedding theme or the desired look for the Gerbera daisies. Dusting with edible petal dust can add depth and realism.
- Assembly Sequence: Assemble the flower in layers, starting with the smallest petals closest to the center and working outward with larger petals. Ensure that the petals overlap naturally.
- Shape Petals: Gently shape and curve the petals to mimic the natural curvature of Gerbera daisy petals.
- Supportive Structure: If you’re making a large flower or one with multiple layers of petals, consider using a supportive structure like a floral wire or styrofoam ball inside the center to help maintain its shape.
- Storage: Once the flower is dry, store it in an airtight container away from direct sunlight to prevent fading and damage.
- Practice Variations: Experiment with different petal sizes, colors, and arrangements to create unique Gerbera daisy designs.
- Inspiration and Learning: Look for tutorials, books, and videos from experienced sugar flower artists for inspiration and learning opportunities.
- Ask for Feedback: Don’t hesitate to seek feedback from experienced cake decorators or peers in sugar flower crafting communities. Constructive feedback can help you improve.
- Time Management: Sugar flowers can be time-consuming, so plan ahead and allocate enough time for the project, especially if you’re making multiple flowers for a wedding cake.
About Videos – most recipes has two videos – a quick version in the post & longer detailed version on this recipe card. Sometimes a similar recipe video may be used. Please do subscribe to my channel if you like my videos
The nutrition information and metric conversion are calculated automatically. I cannot guarantee its accuracy. If this data is important to you please verify with your trusted nutrition calculator. Thank you
- Gum paste Ranunculus
- Best Gumpaste Rose Tutorials – Classic Sugar Rose
- Gumpaste English Rose Tutorials
- Chocolate Roses Tutorials
- Gumpaste Filler flowers Tutorials

Sugar Tulip Flower Tutorials

Chocolate Roses Tutorials

Sugar Leaves Tutorials

Gumpaste Sweet Pea Flower Tutorials
More recipes and tutorials:
 Indian Fusion Cake Recipes to try
 Gumpaste Daisy Tutorial – How to make a Gum Paste Daisy
 Buttercream Flower Painting Tutorials
 Best Gumpaste Rose Tutorials – Classic Sugar Rose
 Tutorials on Gumpaste Sugar Berries
 Frozen Fun: How to Make an Adorable Olaf Cake
 Glossy Buttercream
 Red Velvet Cake Recipe


