
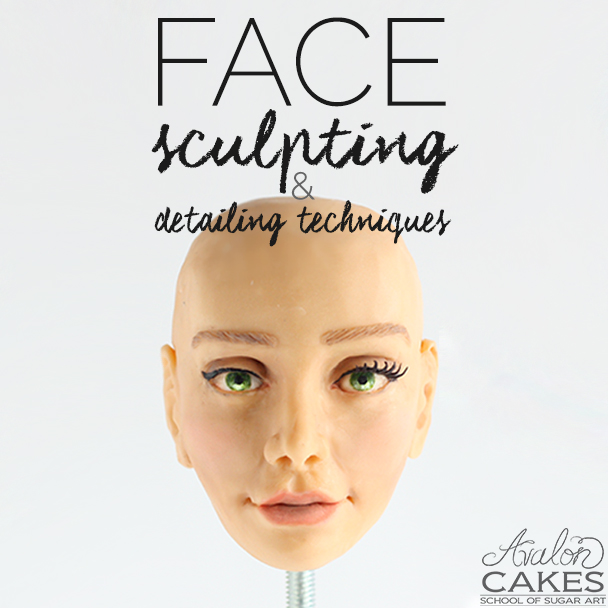
Sculpting fondant faces is a fascinating and rewarding skill, whether you’re a seasoned cake decorator or just beginning to explore the sweet world of sugar paste. These lifelike faces can breathe life and personality into your cake designs, making them stand out and leave a lasting impression on anyone who beholds them.

Remember that sculpting fondant faces takes practice, and it’s perfectly fine to start with simpler designs and work your way up to more complex ones. Over time, you’ll develop your own unique techniques and style for creating beautiful and lifelike gumpaste faces to enhance your cake decorating projects.
Materials You’ll Need:
- Gumpaste: Gumpaste is a sugar-based modeling paste that dries hard and is ideal for sculpting intricate details. You can find pre-made gumpaste or make your own using fondant and tylose powder.
- Fondant: Fondant is used to cover the cake, but it can also be mixed with gumpaste to create a more pliable and workable mixture.
- Tools: Various sculpting tools like small rolling pins, ball tools, modeling tools, and fine brushes will be essential for shaping and detailing your gumpaste faces.
- Edible Gel Colors: Gel-based food colors will allow you to create realistic skin tones and add color to the facial features.
- Edible Glue: Edible glue or a mixture of gumpaste and water can be used to attach different parts of the face together.
- Reference Images: Gather reference images of the human face from various angles to help guide your sculpting process. This will help ensure accuracy and realism
Steps to Sculpting a Human Face with Gumpaste:
- Step 1: Prepare Your Workspace
- Ensure your workspace is clean and well-lit.
- Have all your materials and tools ready for easy access.
- Cover your work surface with a clean, smooth, and non-stick surface like a silicone mat.
- Step 2: Mix Gumpaste and Fondant
- Start by mixing a small amount of gumpaste with fondant in a 1:1 ratio. This mixture will provide you with a balance of pliability and firmness for sculpting.
- Step 3: Create the Basic Face Shape
- Begin by shaping a small portion of your gumpaste-fondant mixture into an oval or teardrop shape. This will be the basic structure of the face.
- Step 4: Add Facial Features
- Use your reference images to guide you as you add facial features one at a time.
- Start with the eyes, making small balls of gumpaste and shaping them into eye sockets. Add colored gumpaste or edible gel colors for the irises.
- Create the nose, mouth, and ears using small pieces of gumpaste and shaping tools.
- Use a fine brush and edible colors to add shading and details to the facial features.
- Step 5: Sculpt Hair and Hairline
- Sculpt the hair using small strands of gumpaste and attach them to the top of the face. Create texture and volume by using various tools and techniques.
- Define the hairline and add any additional hair details.
- Step 6: Let It Dry
- Allow your gumpaste face to air dry or use a food dehydrator to speed up the drying process. This can take several hours to overnight, depending on the size and thickness of your sculpture.
- Step 7: Attach to Cake
- Once your gumpaste face is completely dry, carefully place it on your cake using a dab of edible glue or more gumpaste and water mixture.
- Step 8: Finishing Touches
- Make any final adjustments and touch-ups as needed. Add any additional details like eyebrows, eyelashes, or blush for a more realistic look.
While it may seem challenging at first, with practice and patience, you’ll be able to create stunning cake toppers and decorations that will impress your friends, family, or clients. Here is a step-by-step image by Crumb Avenue.

How To Make A Fondant Girl Face
This lovely tutorial is by Luiz Costa Biscuit. You need no sound to watch this one. Just keep staring at how beautifully its sculpted from scratch. With the use of simple tools and easy techniques, this video is worth a watch.
How to create a Fondant Face
Sara Tidei from OFFICINA DELLO ZUCCHERO has a video which pulls you through every detail you need to know. She not only shows you how to create the face but also teaches you how to make it look realistic with natural looking eyes and fuller painted lips. Watch out for the video given below
Expressive Fondant Face Tutorial
Want to play a little with Expressive looking faces?? Here’s a tutorial by The Confectionery Gallery. This video teaches you how to make a face with details like making fondant teeth, tongue and an open mouth. It also guides you through creating sugar paste hair and ears.
How To Make A Sugar Paste Face With Curly Hair
Here’s another video from The Confectionery Gallery which teaches you how to create another expressive face. This video also guides you with details on how to make fondant curly hair. The Confectionery Gallery makes Fondant Face sculpting looks so easy.
How to make a fondant face explained step by step by OFFICINA DELLO ZUCCHERO
Girl face sculpture with fondant by Lý Anh
How To Make Fondant Face Tutorial by Cakes by Deniz
How to make a fondant face tutorial | EASY & CUTE by Happy Bee Cakes
How to Make Simple Fondant/Gumpast Faces/Heads by Crooked Cakes PH
Using molds instead of freehand sculpting
Remember, every cake decorator has their unique journey and strengths, and not being confident in freehand sculpting should never diminish your passion for this incredible art form. So, don’t feel disheartened about not being able to sculpt freehand
Using molds in your cake decorating projects is a testament to your creativity and dedication. It’s a skill and an art in itself. While some may see it as a shortcut, I see it as a beautiful and valid way to express your creativity.
Materials You’ll Need:
- Gumpaste or Fondant: You’ll still need gumpaste or fondant to fill the molds and create the facial features.
- Gumpaste or Fondant Molds: These are readily available in cake decorating supply stores or online. Choose molds that match the style and size of the faces you want to create. There are molds for different facial expressions, ages, and ethnicities.
- Cornstarch or Confectioner’s Sugar: This is used to prevent the gumpaste or fondant from sticking to the mold.
- Rolling Pin: You’ll need this to roll out the gumpaste or fondant to the desired thickness.
- Spatula or Knife: For trimming excess gumpaste or fondant.
- Food Colors: To paint and color the molded faces.
Steps to Using Molds for Gumpaste Faces:
- Step 1: Prepare Your Workspace
- Ensure your work surface is clean and free of any debris.
- Have all your materials and tools ready.
- Step 2: Prepare the Mold
- Dust the mold cavities with a thin layer of cornstarch or confectioner’s sugar. This prevents the gumpaste or fondant from sticking to the mold.
- Step 3: Roll Out the Gumpaste/Fondant
- Roll out your gumpaste or fondant on a clean, non-stick surface using a rolling pin. Ensure it’s large enough to cover the entire mold cavity.
- Step 4: Press the Gumpaste/Fondant into the Mold
- Carefully press the rolled-out gumpaste or fondant into the mold cavities, ensuring you fill every detail.
- Use a spatula or a knife to trim away any excess gumpaste or fondant, creating a clean edge.
- Step 5: Remove the Molded Faces
- Gently flex the mold to release the molded faces. Be patient and careful to avoid damaging the details.
- Place the molded faces on a clean surface to air dry. Depending on the thickness and humidity, this can take several hours to a day or more.
- Step 6: Paint and Color the Faces
- Once the molded faces are dry, use edible gel colors and fine brushes to paint and add details to the facial features.
- You can customize the skin tones, eye colors, and any other details to match your cake design.
- Step 7: Attach to Cake
- Use edible glue or a mixture of gumpaste and water to attach the molded faces to your cake.
Using molds can save time and provide consistent results, making it an excellent option for cake decorators, whether beginners or professionals. It’s essential to practice with the molds and experiment with different colors and techniques to achieve the desired look for your cake decorations.
Images for Inspiration


Faces by – avaloncakesschool, crumbavenue, silviamancinicakeart, niesjewolters, Laura Ciccarese, Laura Ciccarese, Bolo em Branco [by Margarida Duarte], quierocakes, Sabrina Adamo


